Author Archives: Ben McDermott

Create a Private Chatter Group

See my previous post on creating a Public Chatter Group for the basics of this tutorial.

The only difference is in the last step, where we will select “Private” rather than public.  This limits access to only those Chatter users who are approved to see the group and its updates.

The benefits of a Private Chatter Group are as follows:

1. Share information with a select subset of Salesforce Users

2. Share information with Customers via a Portal (or with Chatter Licenses)

3. Build individual groups for projects with updates the entire company doesn’t need access to.


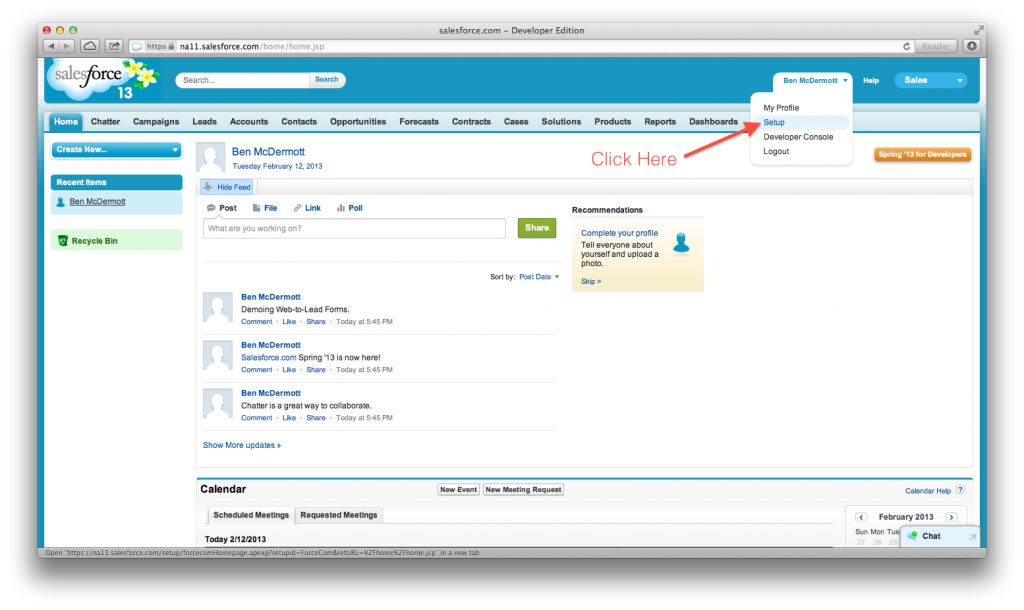
First, we need to make sure Chatter is enabled.  To do this, click your name and “Setup.”

Access the Salesforce Setup page.

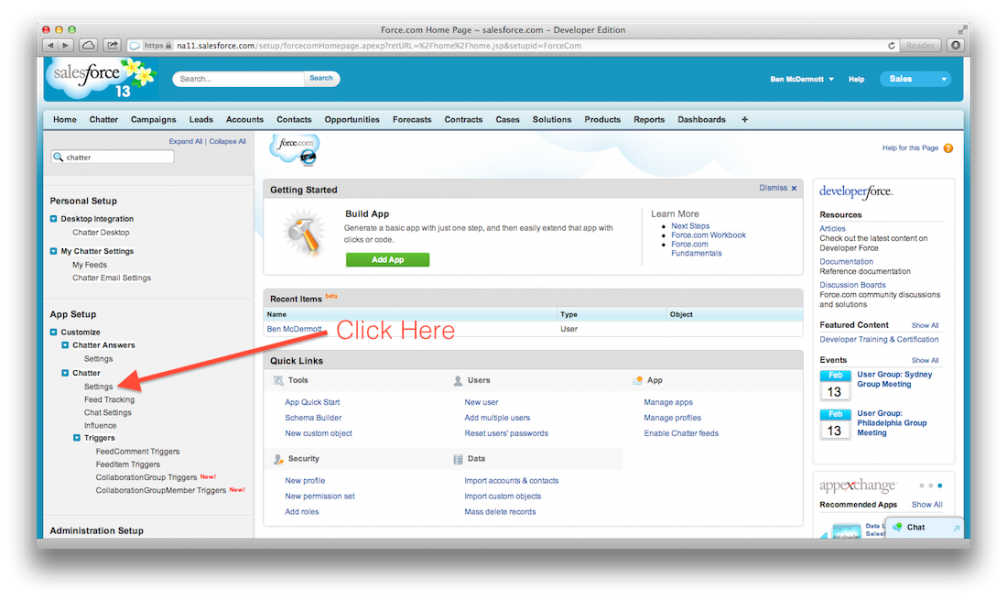
Then click Chatter > Settings.

Click through to Chatter Settings.

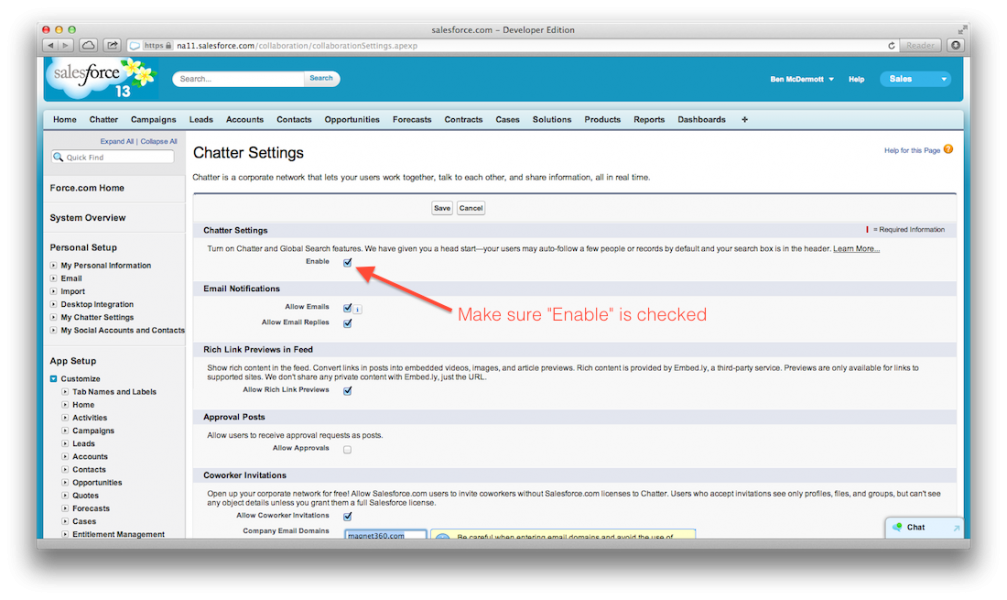
And finally, make sure the “Enabled” checkbox is ticked.

Check the "Enable" checkbox.
Check the “Enable” checkbox.

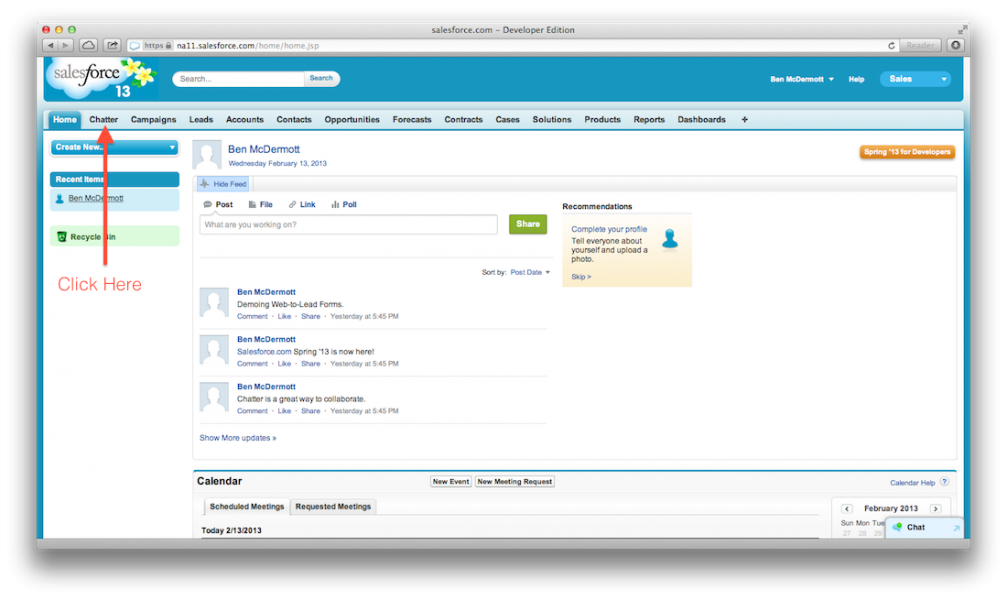
Now, on to creating a Private Chatter Group.  Navigate to your Chatter Homepage.

Click through to the Chatter homepage.

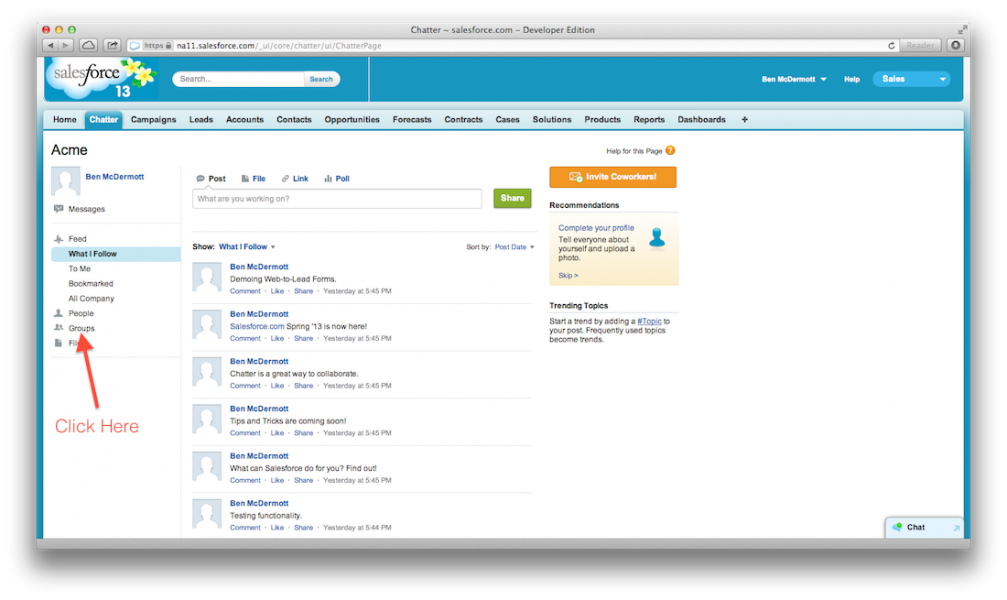
Click the “Groups” link on the left sidebar.

Click through to the "Groups" page.
Click through to the “Groups” page.

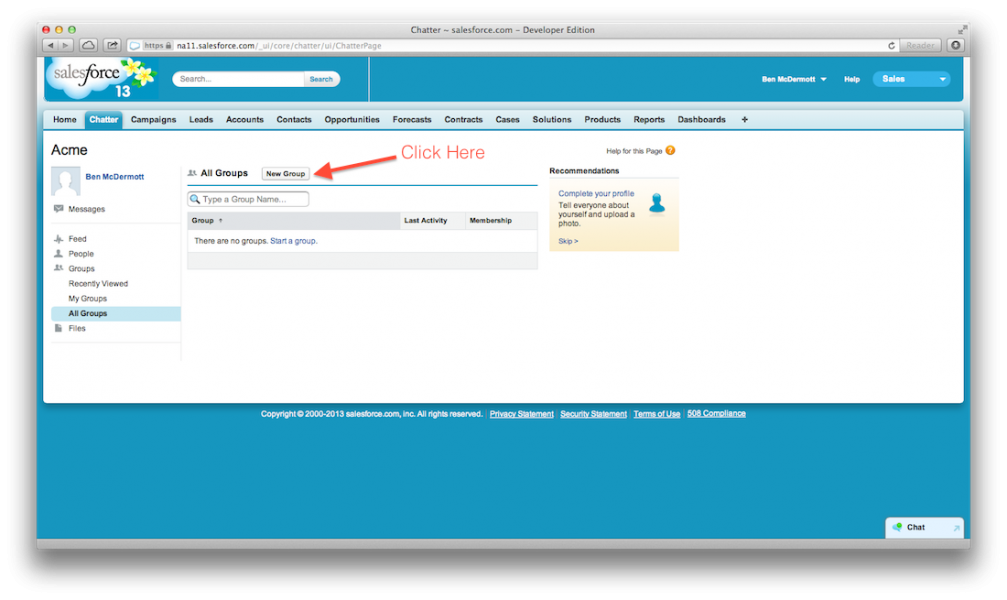
At the top of the page, click “New Group” to create your Chatter Group.

Click "New Group"
Click “New Group”

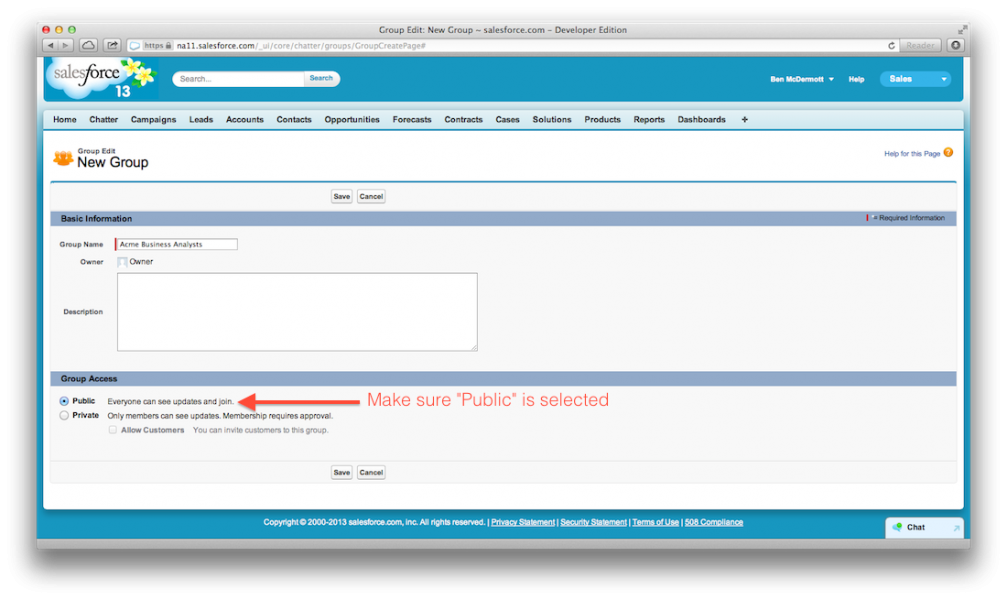
Tick the private radio button.  This means that only those with explicit access to the group will be able to see posts made within the group.

Select the "Public" button.
Select the “Private” button.

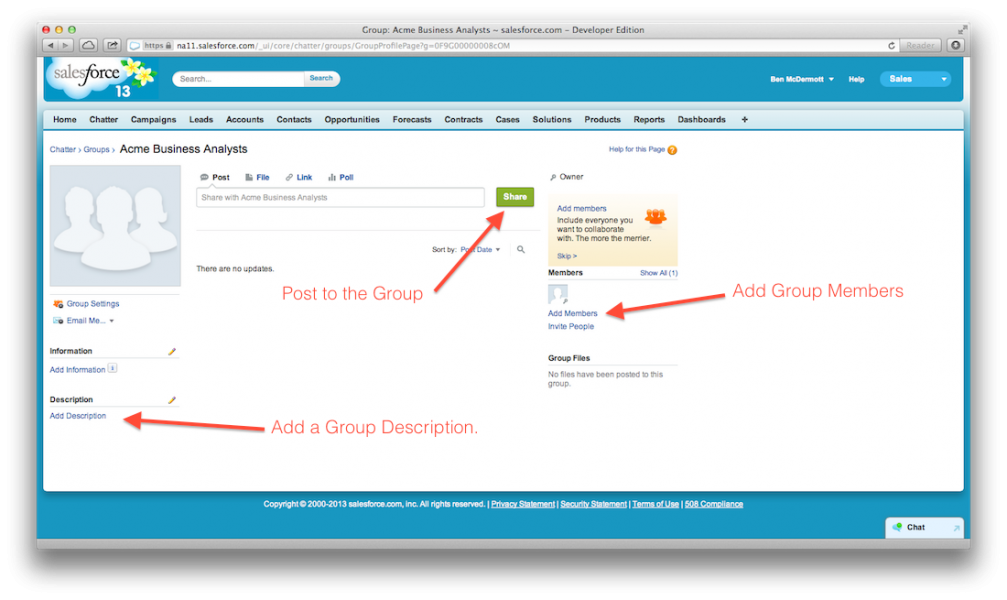
After clicking Save, your Chatter Private Group is ready.


Update your group description, add users, or post to your new group.
Post to the private group, add a description, or add users who should be included in the private group.

Your Private Group is ready!  Anything you post within this group will be private and shown only to those with access to the group.  Granting access is done by adding group members.  Please also note that System Administrators will have access whether or not they are a member of the Private Group.

And as always, I’d happily respond to questions/comments/suggestions!

Guest post: Get a warning before closing a window in Salesforce

I’m sure many of you have experienced this before.  You’re typing up some important notes on a Case for a client, or finishing up a long paragraph detailing how a meeting with a client went on their Account record, and then you realize you need to look at their Contact details.  You click away.  Whoops.  There goes all that work, with one click.

This phenomenon causes countless Salesforce users to lose hours of work, and can be fixed very easily.  We designed an app called Saver (https://appexchange.salesforce.com/listingDetail?listingId=a0N3000000B3eYIEAZ) and it solves this issue.

If you’re editing a record (inline or on the edit page) and you accidentally click away or close the window, Saver will pop up a simple warning, allowing you to stay on the page and save your work.

At only $2/User/Month, Saver is dirt cheap compared to the cost of rework.  If each user saves only 10 minutes of rework per month, the app pays for itself.

We’d love to get the word out about this app and help companies preserve data, increase user satisfaction, and eliminate rework forever!

Buy Saver Here: https://appexchange.salesforce.com/listingDetail?listingId=a0N3000000B3eYIEAZ

-Saver Team

Create a Public Chatter Group

Chatter is the Twitter of Salesforce.  It allows users to post short updates regarding certain records, groups, or general news.  This short guide will walk you through the steps of creating a Public Chatter Group that enables users to share information with a certain set of people.

First, make sure Chatter is enabled.  To do this, click your name and “Setup.”

Access the Salesforce Setup page.

Access the Salesforce Setup page.

Then click Chatter > Settings.

Click through to Chatter Settings.

Click through to Chatter Settings.

And finally, make sure the “Enabled” checkbox is ticked.  Once its ticked, you’re all set!

Check the "Enable" checkbox.

Check the “Enable” checkbox.

Now, to the point of the post, creating a Public Chatter Group.  Navigate to your Chatter Homepage.

Click through to the Chatter homepage.

Click through to the Chatter homepage.

Click the “Groups” link on the left sidebar.

Click through to the "Groups" page.

Click through to the “Groups” page.

At the top of the page, click “New Group” to create your Chatter Group.

Click "New Group"

Click “New Group”

Select the public radio button.  This allows all Chatter users to see the group, its updates, and join if they like.  We’ll go over the creation of a private group in this post.

Select the "Public" button.

Select the “Public” button.

After clicking Save, your Chatter Public Group is ready to use.  You can now add users, edit the group description, or post updates to the group.


Update your group description, add users, or post to your new group.

Update your group description, add users, or post to your new group.

Now that your Public Group is ready to use, start posting!  Chatter serves its users best when everyone is sharing and collaborating.  There are even some nice reports that show interaction with Chatter and allow for interaction-based rewards.

Check out my other post on Private Chatter Groups.

And as always, I’d happily respond to questions/comments/suggestions!

Web-To-Lead Form

Is there a disconnect between your website’s lead form and Salesforce.com?  Want to capture all the information leads enter on your website in Salesforce?

The Web-To-Lead form is the most efficient way to do so.  With Salesforce’s web-to-lead form generator, the user can choose which fields they would like to capture (Name, Address, Email, Phone Number, etc) and automatically create the HTML needed to embed those same fields into a form on any website.  This process (illustrated below) syncs your online web presence with Salesforce data and eliminates manual upload.

To begin, click on your name in the upper right hand corner of the screen, then click “Setup.”
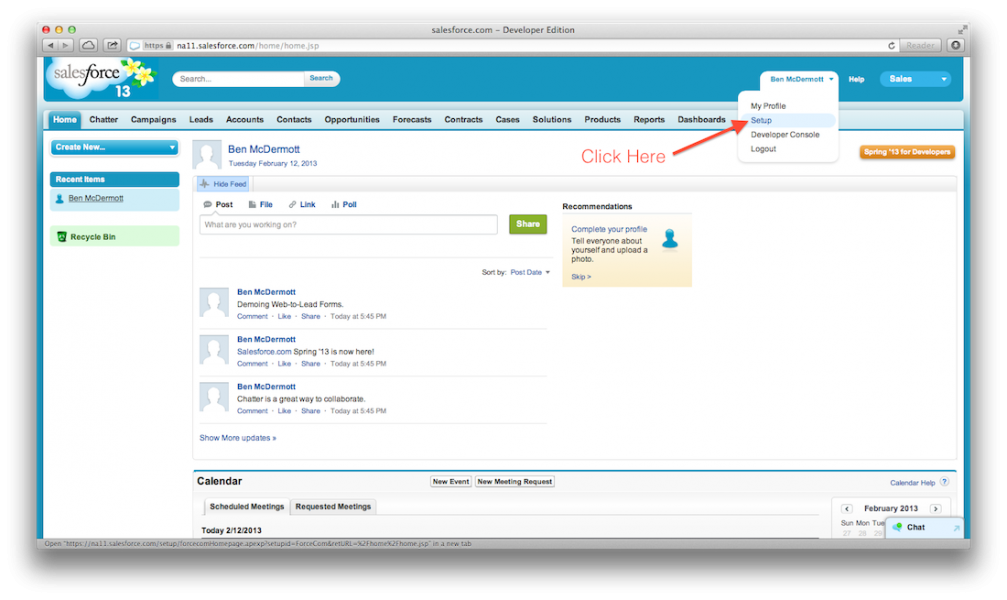
Access the Salesforce Setup page.

Access the Salesforce Setup page.

Once on the Setup page, type “web” into the Quick Find Search and click “Web-to-Lead.”
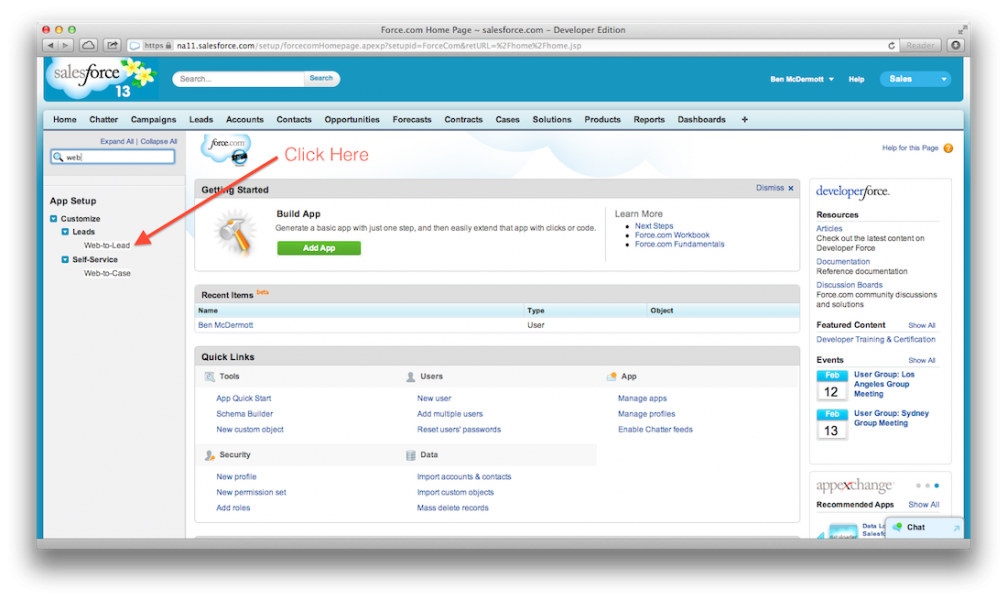
Access the Web-to-Lead page in Salesforce.

Access the Web-to-Lead page in Salesforce.

Now simply click the “Create Web-to-Lead Form” Button.  (Note: If Web-to-Lead is not yet enabled, click the “Edit” button and check the “Web-to-Lead Enabled” checkbox)
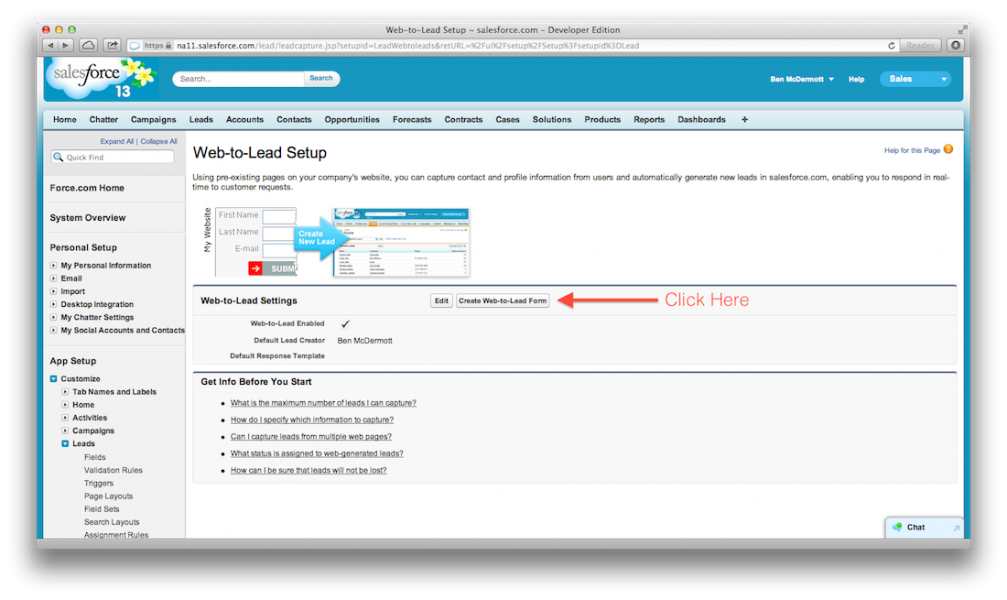
Click the "Create Web-to-Lead Form" Button

Click the “Create Web-to-Lead Form” Button

Now you get to select what information you’d like to capture from your Leads.  This is usually standard information like Name, Email, Phone number, and Address, but Salesforce allows you to use custom fields that have been created as well.  This could range from what type of Dog a customer has to the number of people in their family.  The sky is really the limit on this – but be sure not to include too many fields as customers are more likely to fill out a simple form than an overbearing no holds barred page-long interview.

You’ll also note a Return URL field – this tells Salesforce where to send the customer after they hit “submit” on your form.  I would recommend creating a custom Thank You page so that users know their form submission was successful and also to show them that you do in fact care that they gave you information!
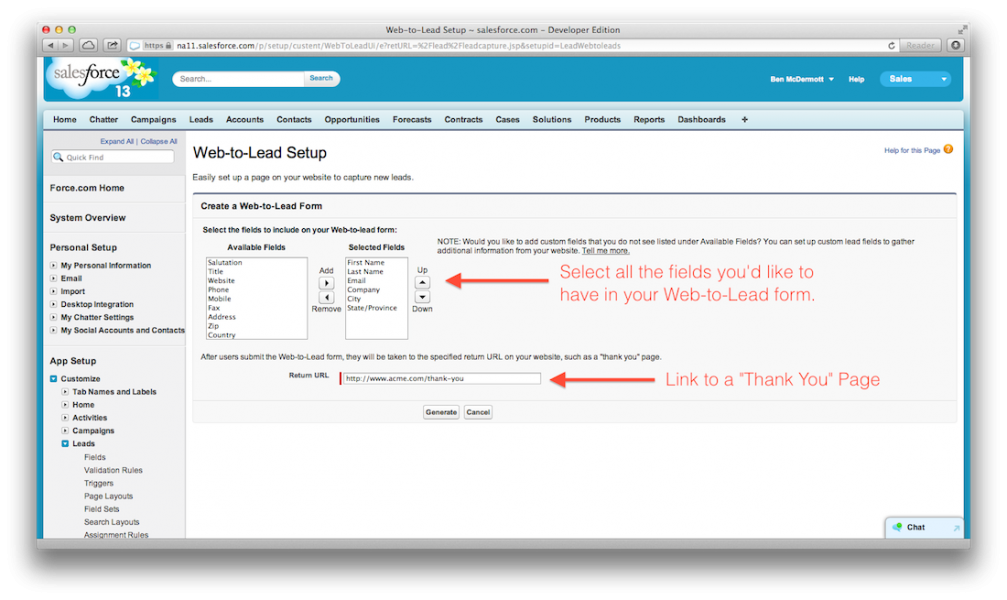
Create your Web-to-Lead Form.

Create your Web-to-Lead Form.

Now click the “Generate” button and Salesforce will automatically create the HTML for your form.  Salesforce provides instructions embedded within the code that explain how to insert this into your website.  Feel free to stop here and hand the snippet of code over to your Developer or continue on and learn how to do it yourself!

There are two main steps to embedded the HTML form into your web page.  The first is to add a small piece of code in between the <head> and </head> tags on the page.

<META HTTP-EQUIV=”Content-type” CONTENT=”text/html; charset=UTF-8″>


Next, you’ll insert the entire form wherever you’d like on the page:

<form action=”https://www.salesforce.com/servlet/servlet.WebToLead?encoding=UTF-8″ method=”POST”>

<input type=hidden name=”oid” value=”00DG0000000Brnp”>
<input type=hidden name=”retURL” value=”http://www.acme.com/thank-you”>

<label for=”first_name”>First Name</label><input id=”first_name” maxlength=”40″ name=”first_name” size=”20″ type=”text” /><br>

<label for=”last_name”>Last Name</label><input id=”last_name” maxlength=”80″ name=”last_name” size=”20″ type=”text” /><br>

<label for=”email”>Email</label><input id=”email” maxlength=”80″ name=”email” size=”20″ type=”text” /><br>

<label for=”company”>Company</label><input id=”company” maxlength=”40″ name=”company” size=”20″ type=”text” /><br>

<label for=”city”>City</label><input id=”city” maxlength=”40″ name=”city” size=”20″ type=”text” /><br>

<label for=”state”>State/Province</label><input id=”state” maxlength=”20″ name=”state” size=”20″ type=”text” /><br>

<input type=”submit” name=”submit”>

</form>

If you’d like to test in debug mode, add the following just after the form action (<form action=”https://www.salesforce.com/servlet/servlet.WebToLead?encoding=UTF-8″ method=”POST”>):

<input type=”hidden” name=”debug” value=1>

<input type=”hidden” name=”debugEmail” value=”INSERT YOUR EMAIL ADDRESS HERE”>


And that should do it!  Now your form is available to any website visitors that come to your page and the fields are mapped directly to Salesforce.  I’d recommend testing this by entering a few fake leads into the form and looking to see whether or not they’re created in Salesforce.  Otherwise, you’re done, and the only thing to consider is that Salesforce only allows 500 Web-to-Leads created per day.  For most companies, this would be a GREAT day!  However, if you’re part of a larger organization and expect a lot of traffic, be aware of this limit.

Please add suggestions in the comments for improvements or other topics you’d like to see so I can make this the best resource possible!